HTML5 Lưu trữ dữ liệu web


Bài trước, chúng ta đã tìm hiểu một đặc điểm thú vị của HTML5: hỗ trợ vẽ các đối tượng 2D thông qua thẻ canvas. Hôm nay, chúng ta lại tiếp cận một API mới của HTML5, lưu trữ dữ liệu web ở phía máy khách.

Lưu trữ web là một đặc điểm kỹ thuật được đưa ra bởi W3C, hỗ trợ việc lưu trữ dữ liệu tại phiên làm việc của người dùng hoặc lưu trữ trong thời gian lâu dài. Nó cho phép lưu trữ 5 MB thông tin cho mỗi tên miền.

Có 2 loại:

  • sesionStorage: lưu trữ dữ liệu trong một phiên làm việc (sẽ bị xóa khi đóng cửa sổ trình duyệt)

Ví dụ: xây dựng phiên làm việc của người dùng sau khi đăng nhập, …

  • localStorage: lưu trữ cục bộ (thông tin được lưu trữ lâu dài, không giới hạn thời gian)

Ví dụ: đếm số lần người dùng đã truy cập trang; ghi nhớ thông tin tài khoản, mật khẩu cho lần đăng nhập sau, …

Trước khi sử dụng sessionStorage và localStorage, chúng ta phải kiểm tra trình duyệt hiện tại có hỗ trợ 2 dạng lưu trữ này không?
Code tham khảo kiểm tra trình duyệt:

<!DOCTYPE HTML>
<html>
<head>
<meta charset="utf-8">
<title>Kiểm tra lưu trữ phiên</title>
<script>
function checkSupport()
{
	if (('sessionStorage' in window) && window['sessionStorage'] !== null)
    {
    	alert("Trình duyệt hỗ trợ lưu trữ web");
        return;
    }
    alert("Trình duyệt không hỗ trợ lưu trữ web"); 
}
</script>
</head>

<body onLoad="checkSupport()">
</body>
</html>

Để kiểm tra localStorage trong trình duyệt: thay đổi dòng code:

if (('sessionStorage' in window) &amp;amp;&amp;amp; window['sessionStorage'] !== null)

thành

if (('localStorage' in window) &amp;amp;&amp;amp; window['localStorage'] !== null)

1. Cách lưu trữ dữ liệu:

Có 3 cách để lưu trữ:

  • Thông qua các hàm hỗ trợ sẵn: lưu trữ dạng key/value (biến/giá trị)
    + Gán giá trị cho biến: sessionStorage.setItem(“key”) = value (key,value có thể là chuỗi hoặc số)
    sessionStorage.setItem(‘name’, ‘user’)
    + Lấy giá trị của biến: sessionStorage.getItem(“key”)
    sessionStorage.getItem(‘name’)
    + Xóa một giá trị biến đã tạo: sessionStorage.removeItem(“key”)
    sessionStorage.removeItem(‘name’)
    + Xóa tất cả các biến đã tạo: sessionStorage.clear()
  • Thông qua cú pháp mảng: sessionStorage[“key”] = value
    sessionStorage[‘name’] = ‘user’
  • Thông qua toán tử dấu chấm: sessionStorage.key = value
    sessionStorage.name = “user”

Ghi chú: 3 cách lưu trữ này cũng áp dụng cho localStorage

Ví dụ đơn giản để lưu trữ dữ liệu:

<!DOCTYPE HTML>
<html>
<head>
<meta charset="utf-8">
<title>Working with Session Storage</title>
<script>
function testStorage()
{
	if(('sessionStorage' in window) && window['sessionStorage'] != null){
		sessionStorage.setItem('name', 'Sarah');
		document.write("The name is:" + sessionStorage.getItem('name') + "
");
		sessionStorage.setItem(6, 'Six');
		document.write("The number 6 is : " + sessionStorage.getItem(6) + "
");
		sessionStorage["age"] = 20;
		document.write("The age is : " + sessionStorage.age);
	}
}
</script>
</head>

<body onLoad="testStorage()">
</body>
</html>

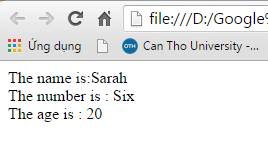
Kết quả:

1

2. Ví dụ: Sử dụng sessionStorage để tạo phiên làm việc khi người dùng đăng nhập:

Kịch bản xử lý như sau:

  • Tạo form đăng nhập.
  • Tạo một trang thanhcong.html để hiển thị thông báo đăng nhập thành công.
  • Nếu người dùng chưa đăng nhập -> hiển thị trang thanhcong.html thì có thông báo “Bạn chưa đăng nhập”
  • Nếu người dùng vào trang đăng nhập rồi tiến hành đăng nhập -> sau khi đăng nhập thành công, qua trang thanhcong.html và hiển thị “Chúc mừng bạn tên đăng nhập đã đăng nhập thành công”.

Code:

Trang đăng nhập (dangnhap.html)

<!DOCTYPE HTML>
<html>
<head>
<meta charset="utf-8">
<title>Phiên làm việc người dùng</title>
<script>
function kiemTra()
{
	//kiem tra du lieu
	if(('sessionStorage' in window) && window['sessionStorage'] !== null){
		// bỏ qua bước bắt lỗi tài khoản, mật khẩu
		
		// tạo sessionStorage với key là user lưu tài khoản người dùng
		sessionStorage.setItem('user', document.frm.txtTK.value);
		// tạo sessionStorage với key là pass lưu mật khẩu người dùng
		sessionStorage.setItem('pass', document.frm.txtMK.value);
		return true;
	}else alert("Không hỗ trợ");
}
</script>
</head>
<body >

<form name="frm" onSubmit="return kiemTra()" action="thanhcong.html">

<table>

<tr>

<td>Tài khoản:</td>


<td><input name="txtTK" /></td>

</tr>


<tr>

<td>Mật khẩu:</td>


<td><input name="txtMK" type="password"/></td>

</tr>


<tr align="center">

<td colspan="2"><input type="submit" value="Đăng nhập" /></td>

</tr>

</table>

</form>

</body>
</html>

Trang thông báo thành công (thanhcong.html):

<!doctype html>
<html>
<head>
<meta charset="utf-8">
<title>Thanh cong</title>
<script>
if(sessionStorage.getItem('user') != null)
	document.write("Chúc mừng bạn " 
					+ sessionStorage.getItem('user') 
					+ " đã đăng nhập thành công");
else document.write('Bạn chưa đăng nhập');
/* Xử lý nút thoát : xóa biến lưu trữ user*/
function thoat(){
	sessionStorage.removeItem('user');
	location.href="thanhcong.html";
}
</script>
</head>

<body>

<form>
<input value="Thoát" type="button" onClick="thoat()" />
</form>

</body>
</html>

Video:

3. Ví dụ: Sử dụng localStorage để đếm số lần người dùng truy cập vào trang web:

Mỗi lần người dùng vào trang web:

  • Nếu là lần đầu tiên: khởi tạo biến localStorage[‘truy cập’] là 1.
  • Nếu là lần thứ 2 về sau: cộng thêm 1 vào biến localStorage[‘truy cập’]

Chú ý: Tắt trình duyệt và mở lên lại thì biến localStorage[‘truy cập’] vẫn cập nhật từ giá trị cũ.

Code:

<!DOCTYPE HTML>
<html>
<head>
<meta charset="utf-8">
<title>Lưu trữ cực bộ</title>
<script>
function store()
{
	if(('localStorage' in window) && window['localStorage'] != null){
		if(localStorage.getItem('truycap') == null)
			localStorage.setItem('truycap', 1);
		else 
			localStorage.setItem('truycap', parseInt(localStorage.getItem('truycap')) + 1);
		document.write("Số lần đăng nhập = " + localStorage.getItem('truycap'));
		
	}
	else{
		alert("Trình duyệt không hỗ trợ LocalStorage");
	}
}
</script>
</head>
<body onLoad="store()">
</body>
</html>

Kết quả:
Lần chạy đầu tiên:
          Số lần đăng nhập = 1
Reload lại trang:
          Số lần đăng nhập = 2
Các lần chạy tiếp theo -> mỗi lần tăng lên 1.
Tắt trình duyệt và chạy lại trình duyệt vừa rồi:
          Số lần đăng nhập = 3
Các bạn có thể tham khảo thêm:
4. Ví dụ sử dụng localStorage để ghi nhớ thông tin đăng nhập:

<!DOCTYPE HTML>
<html>
<head>
<meta charset="utf-8">
<title>Lưu trữ cực bộ</title>
<script>
function loadData(){
	if(('localStorage' in window) 
		&& window['localStorage'] != null 
		&& localStorage.getItem('ghinho')
		 ){
		document.frmDangNhap.txtDN.value = localStorage.getItem('tendangnhap');
		document.frmDangNhap.txtMK.value = localStorage.getItem('matkhau');
	}
}
function store()
{
	var tendangnhap = document.getElementById("txtDN").value;
	var matkhau = document.getElementById("txtMK").value;
	var ghinho = document.getElementById("chkGhiNho");
	if(('localStorage' in window) && window['localStorage'] != null){
		localStorage.setItem('tendangnhap', tendangnhap);
		localStorage.setItem('matkhau', matkhau);
		alert("Tên người dùng : " + localStorage.getItem('tendangnhap') + ", Mật khẩu : " + localStorage.getItem('matkhau'));
	}
	else{
		alert("Trình duyệt không hỗ trợ LocalStorage");
	}
	
	//ghi nho thong tin
	if(ghinho.checked)
	{
		localStorage.setItem('ghinho', 1);
	}
}
</script>
</head>
<body onLoad="loadData()" >

<form method="get" name="frmDangNhap" >

<table width="50%" border="1" align="center">

<tr>

<th colspan="2" scope="col">Đăng nhập </th>

    </tr>


<tr>

<td>Tên đăng nhập: </td>


<td><input type="text" id="txtDN" name="txtDN" /></td>

  </tr>


<tr>

<td>Mật khẩu:</td>


<td><input type="text" id="txtMK" name="txtMK" /></td>

  </tr>


<tr>

<td></td>


<td><input type="button" value="Đăng nhập" onClick="store();"/>
	<input type="checkbox" id="chkGhiNho" />Ghi nhớ thông tin</td>

  </tr>

</table>

</form>

</body>
</html>

Video tham khảo

Chúc các bạn hiểu được cơ bản về lưu trữ web trong HTML5
HTML5 – Xây dựng hình ảnh động đơn giản thông qua đối tượng canvas


Một tiện ích thú vị nhất của HTML5 là hỗ trợ vẽ các đối tượng 2D. Chúng ta có thể vẽ hình tròn, hình chữ nhật, đoạn thẳng, một tấm hình, text, … lên trang web thông qua các phương thức được hỗ trợ sẵn trong Canvas API của HTML5. Nâng cao hơn nữa, xây dựng một giao diện hoạt hình lên web.

Hôm nay, chúng ta sẽ tìm hiểu một ví dụ đơn giản nhất để có được một hình ảnh động.

Vẽ nhiều đối tượng lên một canvas
1

Để tạo được hoạt hình, chúng ta phải vẽ lại các đối tượng ở các vị trí khác nhau và lặp đi lặp lại việc vẽ này thông qua hàm setInterval trong Javascript.

Các bước thực hiện:

  • Tạo đối tượng canvas trong tài liệu để vẽ các hình.
  • Tạo hàm draw() để vẽ các đối tượng (mỗi lần vẽ một hình là một trạng thái -> thiết lập một biến có giá trị thay đổi để gán cho vị trí thay đổi).
  • Cứ mỗi 30/1000 giây sẽ gọi lại hàm draw() một lần để vẽ lại hình ảnh.

Code tham khảo:

<!DOCTYPE html>
<html>
<head>
<meta http-equiv="Content-Type" content="text/html; charset=utf-8" />
<title>HTML5 Animation</title>

<style>
#mySwimmerCanvas{
	/*Hiển thị border của canvas*/
	border: 2px solid #FF0000
}
</style>

<script>
var positionX = 0;
var positionY = 0;
// Gọi lại hàm draw sau mỗi thời gian 30/1000 giây
setInterval(draw, 30);

//Hàm vẽ người
function draw(){
   var centerX = 200; // tọa độ x cho tâm của hình tròn thể hiện cái đầu
   var centerY = 50; // tọa độ y cho tâm của hình tròn thể hiện cái đầu
   var radius = 20;
   // thay đổi tọa độ x, y để thiết lập chuyển động hoạt hình
   if (positionX < 30) { positionX += 1; positionY += 1; } else { positionX = 0; positionY = 0; } // khai báo để vẽ các đối tượng 2d lên canvas var canvasSwimmer = document.getElementById("mySwimmerCanvas"); var contextSwimmer = canvasSwimmer.getContext("2d"); //xóa vị trí cũ để vẽ vị trí mới contextSwimmer.clearRect(0,0,400,400); //bắt đầu vẽ contextSwimmer.beginPath(); /*Vẽ đầu (hình tròn) centerX, centerY: tâm đường tròn radius: kích thước bán kính false: vẽ theo chiều kim đồng hồ */ contextSwimmer.arc(centerX, centerY+positionY, radius, 0, 2 * Math.PI, false); contextSwimmer.fillStyle = "#000000"; contextSwimmer.fill(); /* vẽ thân (đoạn thẳng) vẽ nhiều đối tượng lên một canvas -> mỗi đối tượng phải gọi beginPath() lại 
	*/
	contextSwimmer.beginPath(); 
	contextSwimmer.moveTo(200,70+positionY); // điểm thứ nhất để vẽ
	contextSwimmer.lineTo(200,175); // điểm thứ hai để vẽ
	contextSwimmer.lineWidth = 10; // độ rộng đoạn thẳng
	contextSwimmer.strokeStyle = "#000000";  // màu đoạn thẳng
	contextSwimmer.lineCap = "round"; // bo tròn hai đầu đoạn thẳng
	contextSwimmer.stroke(); // vẽ đoạn thẳng
	
	// vẽ cánh tay bên phải (đoạn thẳng)
	contextSwimmer.beginPath();
	contextSwimmer.moveTo(200, 100);
	contextSwimmer.lineTo(175-positionX,140-positionY);
	contextSwimmer.lineWidth = 10;
	contextSwimmer.strokeStyle = "#000000"; 
	contextSwimmer.lineCap = "round";
	contextSwimmer.stroke();
	
	// vẽ cánh tay bên trái (đoạn thẳng)
	contextSwimmer.beginPath();
	contextSwimmer.moveTo(200, 100);
	contextSwimmer.lineTo(225+positionX,140-positionY);
	contextSwimmer.lineWidth = 10;
	contextSwimmer.strokeStyle = "#000000"; 
	contextSwimmer.lineCap = "round";
	contextSwimmer.stroke();
	
	// vẽ chân bên phải (đoạn thẳng)
	contextSwimmer.beginPath();
	contextSwimmer.moveTo(200, 175);
	contextSwimmer.lineTo(190-positionX,250-positionY);
	contextSwimmer.lineWidth = 10;
	contextSwimmer.strokeStyle = "#000000"; 
	contextSwimmer.lineCap = "round";
	contextSwimmer.stroke();


   // vẽ chân bên trái (đoạn thẳng)
	contextSwimmer.beginPath();
	contextSwimmer.moveTo(200, 175);
	contextSwimmer.lineTo(210+positionX,250-positionY);
	contextSwimmer.lineWidth = 10;
	contextSwimmer.strokeStyle = "#000000"; 
	contextSwimmer.lineCap = "round";
	contextSwimmer.stroke();

}
</script>
</head>

<body onload="draw();">
<canvas id="mySwimmerCanvas" width="400" height="400" >
</canvas>
</body>
</html>

Sau khi hoàn thành (nhấp vào hình để xem kết quả hoàn chỉnh):
animation
Chúc các bạn thành công.

Hai cách quản lý một tập hợp trong Java


Trong java, bạn có thể quản lý tập hợp các phần tử theo 2 cách:

  • Sử dụng mảng
  • Sử dụng danh sách

Trong khuôn khổ bài này, chúng ta cùng tìm hiểu ArrayList – một lớp đơn giản để quản lý tập hợp.
Yêu cầu:
Tạo một chương trình để người dùng quản lý 5 phần tử kiểu int và lưu vào một mảng.

  • In giá trị các phần tử trong mảng.
  • In các phần tử theo thứ tự giảm dần.
  • In các phần tử trong mảng mà chia hết cho 5.
  • Cho người dùng nhập vào một số, hiển thị số lần xuất hiện của số vừa nhập có trong mảng ban đầu.

Output:
1

1. Cách 1: Khởi tạo mảng int theo cách thông thường:

int[] array = new int[5];

Nếu khởi tạo mảng dạng này, khi chúng ta gán mảng 5 phần tử thì số phần tử đó là cố định. Chúng ta muốn tăng số phần tử lên để quản lý nhiều hơn thì phải tốn nhiều công sức cho bước tăng trưởng. Đây cũng là sự bất tiện của cách quản lý này.

Code tham khảo:

public class Array_PrimitiveDataType {

    int[] array;

    public Array_PrimitiveDataType() {
        array = new int[5];
    }
    
    /**
     * input array
     */
    void inputArray(){
        System.out.println("-----Nhap mang-----");
        Scanner input = new Scanner(System.in);
        for (int i = 0; i &amp;lt; array.length; i++) {
            System.out.print("Nhap phan tu thu " + (i+1) + ":");
            array[i] = input.nextInt();
        }
        System.out.println("");
    }
    
    void printArray(){
        System.out.println("-----In----");
        for (int i = 0; i &amp;lt; array.length; i++) {
            System.out.print(array[i] + "\t");
        }
        System.out.println("");  
    }
    
    void sortDescArray(){
        System.out.println("-----Sap xep-----");
        for (int i = 0; i &amp;lt;= array.length - 2; i++) {
            for (int j = i+1; j &amp;lt;= array.length -1; j++) {
                if(array[i] &amp;lt; array[j]){
                    int temp = array[i];
                    array[i] = array[j];
                    array[j] = temp;
                }
            }
        }
    }
    
    void searchNumber(){
        System.out.println("----Tim mot so-----");
        Scanner input = new Scanner(System.in);
        System.out.print("Nhap mot so can tim:");
        int so = input.nextInt();
        int dem = 0;
        for (int i = 0; i &amp;lt; array.length; i++) {
            if(array[i] == so) dem++;
        }
        System.out.println("Co " + dem + " phan tu trong mang co gia tri " + so);
    }
    
    /**
     * @param args the command line arguments
     */
    public static void main(String[] args) {
        Array_PrimitiveDataType demo = new Array_PrimitiveDataType();
        demo.inputArray();
        demo.printArray();
        demo.sortDescArray();
        demo.printArray();
    }  
}

Video:

2. Cách 2: Khởi tạo một đối tượng của lớp ArrayList được hỗ trợ sẵn trong API của Java.

Với việc quản lý này, người dùng tự do thêm bớt phần tử nếu muốn thông qua các phương thức của nó. Vì nó không giới hạn số phần tử được quản lý. Đây là sự thuận tiện khi sử dụng lớp ArrayList so với cách khai báo thông thường.

ArrayList array = new ArrayList();

Đặc biệt: đối tượng trong tập hợp trên chỉ quản lý các đối tượng mà không quản lý các biến kiểu dữ liệu nguyên thủy. Vì vậy, khi thêm dữ liệu mới hoặc lấy ra một phần tử trong tập hợp, chúng ta luôn thao tác với đối tượng (Có thể sử dụng Wrapper Class để quản lý các kiểu dữ liệu nguyên thủy khi cần thiết).

Code tham khảo:

import java.util.ArrayList;
import java.util.Collection;
import java.util.Collections;
import java.util.Iterator;
import java.util.Scanner;

/**
 *
 * @author maithicamnhung
 */
public class Bai1_ArrayList {
    ArrayList arr = new ArrayList();
    
    // Nhap du lieu
    public void inputList(){
        System.out.println("Enter elements:");
        Scanner input = new Scanner(System.in);
        for(int i = 0 ; i < 4 ; i++){
            System.out.println("Element " + (i+1) + ":");
            int value = input.nextInt();
            arr.add(value);
        }
    }
    
    // In du lieu mang
    public void printList(){
        System.out.println("======List=====");
        Iterator iarr = arr.iterator();
        while(iarr.hasNext()){
            System.out.println(iarr.next());
        }
    }
    
    // Sap xep mang tang dan
    public void  printListOrderAsc(){
        Collections.sort(arr);
        System.out.println("======List Order Asc=====");
        Iterator iarr = arr.iterator();
        while(iarr.hasNext()){
            System.out.println(iarr.next());
        }
    }
    
    // Sap xep mang giam dan
    public void  printListOrderDes(){
        Collections.sort(arr, Collections.reverseOrder());
        System.out.println("======List Order Des=====");
        Iterator iarr = arr.iterator();
        while(iarr.hasNext()){
            System.out.println(iarr.next());
        }
    }
    
    // Chia het cho 5
    public void divideFive(){
        System.out.println("Element divide 5:"); 
        Iterator iarr = arr.iterator();
        while(iarr.hasNext()){
            Integer value = (Integer) iarr.next();
            if(value.intValue() % 5 == 0){
                System.out.println(value);
            }
        }
    }
    
    public void searchNumber(){
        Scanner input = new Scanner(System.in);
        System.out.println("Enter number to search:");
        int count = 0;
        int number = input.nextInt();
        Iterator iarr = arr.iterator();
        while(iarr.hasNext()){
            Integer value = (Integer)iarr.next();
            if(value.intValue() == number){
                count++;
            }
        }
        System.out.println("Count: " + count);
    }
    
    public static void main(String[] args) {
        Bai1_ArrayList arrList = new Bai1_ArrayList();
        arrList.inputList();
        arrList.printList();
        arrList.printListOrderAsc();
        arrList.printListOrderDes();
        arrList.divideFive();
        arrList.searchNumber();
    }
}

Video:

Chúc các bạn thành công.

Hướng dẫn cài đặt, cấu hình và chạy chương trình Java đơn giản đầu tiên


  1. Download JDK

Các bạn vào địa chỉ sau để download JDK (hỗ trợ nhiều phiên bản):
http://www.oracle.com/technetwork/java/javase/downloads/index.html
JDK
Chọn Accept License Agreement -> Chọn hệ điều hành đúng để tiến hành tải về.
JDK2
Sau khi tải về, cài đặt như các ứng dụng bình thường.
JDK3
2. Cài đặt JDK
caidat1
Các bạn có thể để đường dẫn mặc định khi cài đặt (C:\) hoặc chọn nơi cài đặt tùy chọn.
Sau khi cài đặt, chúng ta sẽ có 2 thư mục để có thể biên dịch và thông dịch một chương trình java:
caidat2
3. Cấu hình biến môi trường cho java
Cấu hình trên CMD mỗi lần chạy 1 chương trình java bằng dòng lệnh:

– Copy thư mục JDK đã cài đặt : C:\Program Files\Java\jdk1.8.0_20\bin
– 
Thiết lập 2 biến PATH và CLASSPATH mỗi lần thực thi chương trình:
Giả sử, chương trình nằm trong ổ đĩa D:\
path
Cấu hình trên biến môi trường của Window:
path2
Đi đến Advanced system settings, chọn Enviroment Variables:
path3
Tìm đến 2 biến Path và CLASSPATH để thiết lập các giá trị cho 2 biến này.
path4
4. Chạy chương trình đơn giản đầu tiên
Viết một chương trình đầu tiên với lớp Hello trong Notepad và lưu lại với tên Hello.java:
code1Biên dịch Hello.java thành file Hello.class bằng chương trình javac.exe trong bộ JDK vừa cài đặt ở trên:
code2– Vào thư mục chứa tập tin Hello.java, chúng ta sẽ thấy có tập tin Hello.class -> chính là tập tin sau khi biên dịch ra mã byte code.
– Tiến hành thông dịch tập tin Hello.class để thực thi bằng chương trình java.exe:
code3Vậy là, chúng ta đã thực thi được một chương trình java đơn giản.
Chúc các bạn thành công.

Code tham khảo Hello.java

public class Hello {

    /**
     * @param args the command line arguments
     */
    public static void main(String[] args) {
	System.out.println("Hello you");
    }
}

Tham khảo video:

Load danh sách sản phẩm từ MySQL với hiệu ứng CSS3


Khi các bạn xây dựng một website bán hàng trực tuyến chẳng hạn, phần nội dung trang chủ của các bạn phải thể hiện được danh sách các sản phẩm.

  • Trong danh sách này, về mặt hình thức, các bạn có thể bố trí các sản phẩm sắp xếp theo dạng bảng, sử dụng các định dạng CSS để trông đẹp mắt.
  • Tiếp đến là phần nội dung, các bạn sử dụng ngôn ngữ để load trực tiếp dữ liệu từ cơ sở dữ liệu MySQL.

Vì thế, ở ví dụ này, chúng ta sẽ xây dựng một trang chủ đơn giản với dữ liệu động load từ cơ sở dữ liệu, kết hợp với CSS3 tạo giao diện thân thiện người dùng.

Giao diện sẽ xây dựng:

trangchu

Trước khi thực hiện, yêu cầu:

  • Cài đặt chương trình Xampp để sử dụng ngôn ngữ PHP và MySQL.
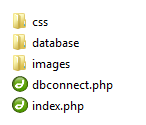
  • Tạo một thư mục gốc danhsachsanpham với các thành phần sau:

thumucgoc

Trong thư mục images, copy 4 hình sản phẩm và đặt tên lần lượt là: 1.png, 2.png, 3.png, 4.png.

Khi mọi thứ sẵn sàng, các bạn làm theo các bước sau:

Bước 1: Vào phpmyadmin, tạo cơ sở dữ liệu tên là quanlybanhang với cấu trúc bảng sanpham như sau:

csdl

Sau đó, chèn 4 sản phẩm vào bảng:

dulieu

Bước 2: Tạo các file css để định dạng danh sách và hiển thị hiệu ứng:

  • demo.css

@import url('reset.css');
/* General Demo Style */
body{
 background:#f9f9f9 url(../images/white_texture.jpg) repeat top left;
 color: #333;
 font-family: 'Oswald', Arial, sans-serif;
 font-size: 13px;
}
.container{
 position:relative;
}
a{
 color: #fff;
 text-decoration: none;
}
.clr{
 clear: both;
}
.main{
 position:relative;
 width:680px;
 margin: 0 auto;
}
h1{
 margin:0px;
 padding:20px 20px 10px 20px;
 font-size:34px;
 color:#333;
 text-shadow:1px 1px 1px #fff;
 text-align:left;
 font-weight:400;
 text-align:center;
}
h1 span{
 display:block;
 font-size: 14px;
 font-family: Georgia, serif;
 font-style: italic;
 color:#b2891b;
 padding-top:10px;
}
/* Header Style */
.header{
 font-family:'Arial Narrow', Arial, sans-serif;
 line-height: 24px;
 font-size: 11px;
 background: #000;
 opacity: 0.9;
 text-transform: uppercase;
 z-index: 9999;
 position: relative;
 -moz-box-shadow: 1px 0px 2px #000;
 -webkit-box-shadow: 1px 0px 2px #000;
 box-shadow: 1px 0px 2px #000;
}
.header a{
 padding: 0px 10px;
 letter-spacing: 1px;
 color: #ddd;
 display: block;
 float: left;
}
.header a:hover{
 color: #fff;
}
.header span.right{
 float: right;
}
.header span.right a{
 float: none;
 display: inline;
}

.more{
 position:relative;
 clear:both;
 font-family:'Arial Narrow', Arial, sans-serif;
 text-transform: uppercase;
 font-size: 11px;
 padding: 5px 0px 10px;
 width: 540px;
 margin: 0 auto;
}
.more ul{
 display:block;
 text-align:center;
 height: 30px;
}
.more ul li{
 display: block;
 padding: 4px 2px;
 float:left;
}
.more ul li.selected a,
.more ul li.selected a:hover{
 background:#b2891b;
 color:#fff;
 text-shadow:none;
}
.more ul li a{
 color:#555;
 float:left;
 background:#fff;
 width:40px;
 padding: 2px 5px;
 -moz-box-shadow:1px 1px 2px #aaa;
 -webkit-box-shadow:1px 1px 2px #aaa;
 box-shadow:1px 1px 2px #aaa;
}
.more ul li a:hover{
 background:#000;
 color:#fff;
}
  • style_common.css:
.view {
   width: 300px;
   height: 200px;
   margin: 10px;
   float: left;
   border: 10px solid #fff;
   overflow: hidden;
   position: relative;
   text-align: center;
   -webkit-box-shadow: 1px 1px 2px #e6e6e6;
   -moz-box-shadow: 1px 1px 2px #e6e6e6;
   box-shadow: 1px 1px 2px #e6e6e6;
   cursor: default;
   background: #fff url(../images/bgimg.jpg) no-repeat center center;
}
.view .mask,.view .content {
   width: 300px;
   height: 200px;
   position: absolute;
   overflow: hidden;
   top: 0;
   left: 0;
}
.view img {
   display: block;
   position: relative;
}
.view h2 {
   text-transform: uppercase;
   color: #fff;
   text-align: center;
   position: relative;
   font-size: 17px;
   padding: 10px;
   background: rgba(0, 0, 0, 0.8);
   margin: 20px 0 0 0;
}
.view p {
   font-family: Georgia, serif;
   font-style: italic;
   font-size: 12px;
   position: relative;
   color: #fff;
   padding: 10px 20px 20px;
   text-align: center;
}
.view a.info {
   display: inline-block;
   text-decoration: none;
   padding: 7px 14px;
   background: #000;
   color: #fff;
   text-transform: uppercase;
   -webkit-box-shadow: 0 0 1px #000;
   -moz-box-shadow: 0 0 1px #000;
   box-shadow: 0 0 1px #000;
}
.view a.info: hover {
   -webkit-box-shadow: 0 0 5px #000;
   -moz-box-shadow: 0 0 5px #000;
   box-shadow: 0 0 5px #000;
}
  • style1.css
.view-first img {
   -webkit-transition: all 0.2s linear;
   -moz-transition: all 0.2s linear;
   -o-transition: all 0.2s linear;
   -ms-transition: all 0.2s linear;
   transition: all 0.2s linear;
}
.view-first .mask {
   -ms-filter: "progid: DXImageTransform.Microsoft.Alpha(Opacity=0)";
   filter: alpha(opacity=0);
   opacity: 0;
   background-color: rgba(219,127,8, 0.7);
   -webkit-transition: all 0.4s ease-in-out;
   -moz-transition: all 0.4s ease-in-out;
   -o-transition: all 0.4s ease-in-out;
   -ms-transition: all 0.4s ease-in-out;
   transition: all 0.4s ease-in-out;
}
.view-first h2 {
   -webkit-transform: translateY(-100px);
   -moz-transform: translateY(-100px);
   -o-transform: translateY(-100px);
   -ms-transform: translateY(-100px);
   transform: translateY(-100px);
   -ms-filter: "progid: DXImageTransform.Microsoft.Alpha(Opacity=0)";
   filter: alpha(opacity=0);
   opacity: 0;
   -webkit-transition: all 0.2s ease-in-out;
   -moz-transition: all 0.2s ease-in-out;
   -o-transition: all 0.2s ease-in-out;
   -ms-transition: all 0.2s ease-in-out;
   transition: all 0.2s ease-in-out;
}
.view-first p {
   -webkit-transform: translateY(100px);
   -moz-transform: translateY(100px);
   -o-transform: translateY(100px);
   -ms-transform: translateY(100px);
   transform: translateY(100px);
   -ms-filter: "progid: DXImageTransform.Microsoft.Alpha(Opacity=0)";
   filter: alpha(opacity=0);
   opacity: 0;
   -webkit-transition: all 0.2s linear;
   -moz-transition: all 0.2s linear;
   -o-transition: all 0.2s linear;
   -ms-transition: all 0.2s linear;
   transition: all 0.2s linear;
}
.view-first:hover img {
   -webkit-transform: scale(1.1,1.1);
   -moz-transform: scale(1.1,1.1);
   -o-transform: scale(1.1,1.1);
   -ms-transform: scale(1.1,1.1);
   transform: scale(1.1,1.1);
}
.view-first a.info {
   -ms-filter: "progid: DXImageTransform.Microsoft.Alpha(Opacity=0)";
   filter: alpha(opacity=0);
   opacity: 0;
   -webkit-transition: all 0.2s ease-in-out;
   -moz-transition: all 0.2s ease-in-out;
   -o-transition: all 0.2s ease-in-out;
   -ms-transition: all 0.2s ease-in-out;
   transition: all 0.2s ease-in-out;
}
.view-first:hover .mask {
   -ms-filter: "progid: DXImageTransform.Microsoft.Alpha(Opacity=100)";
   filter: alpha(opacity=100);
   opacity: 1;
}
.view-first:hover h2,
.view-first:hover p,
.view-first:hover a.info {
   -ms-filter: "progid: DXImageTransform.Microsoft.Alpha(Opacity=100)";
   filter: alpha(opacity=100);
   opacity: 1;
   -webkit-transform: translateY(0px);
   -moz-transform: translateY(0px);
   -o-transform: translateY(0px);
   -ms-transform: translateY(0px);
   transform: translateY(0px);
}
.view-first:hover p {
   -webkit-transition-delay: 0.1s;
   -moz-transition-delay: 0.1s;
   -o-transition-delay: 0.1s;
   -ms-transition-delay: 0.1s;
   transition-delay: 0.1s;
}
.view-first:hover a.info {
   -webkit-transition-delay: 0.2s;
   -moz-transition-delay: 0.2s;
   -o-transition-delay: 0.2s;
   -ms-transition-delay: 0.2s;
   transition-delay: 0.2s;
}
				

Bước 3: Tạo file kết nối với cơ sở dữ liệu

  • dbconnect.php
<!--?php $connect = mysql_connect("localhost", "root", "") or die("Không kết nối được với MYSQL"); mysql_select_db("quanlybanhang", $connect) or die ("Không tìm thấy cơ sở dữ liệu"); mysql_query("SET NAMES utf8"); ?-->

Bước 4: Tạo trang index

<!DOCTYPE html>
<html>
 <head>
 <title>Danh sách sản phẩm</title>
 <meta charset="UTF-8" />
 
 <link rel="stylesheet" type="text/css" href="css/demo.css" />
 <link rel="stylesheet" type="text/css" href="css/style_common.css" />
 <link rel="stylesheet" type="text/css" href="css/style1.css" />
 </head>
 <body>

<div class="container"> 

<div class="main">
 <?php include ("dbconnect.php"); $rs = mysql_query("select * from sanpham"); while($row = mysql_fetch_array($rs)){ ?>

<div class="view view-first">
 <img src="images/<?php echo $row['hinhanh']; ?>" />

<div class="mask">

<h2><?php echo $row['tensanpham']; ?></h2>


<?php echo $row['mota']; ?>

 <a href="#" class="info">MUA HÀNG</a>
 </div>

 </div>

 
 <?php } ?> 
 </div>

 </div>

 </body>
</html>

Chúc các bạn thành công.